Search This Blog

Tuesday, January 16, 2007

Shallots potted up


I potted up my shallots at the weekend. Each one is planted in a 3" pot of 1/3 sterilised topsoil and 2/3 multipurpose compost with added seaweed and superphosphate. They were given a quick watering and put into a cold greenhouse where they won't now be watered again for several weeks as I want them to make good roots that fill the pot. At that point I will pot on into larger pots (probably 5 or 6").

Last year I actually buried these pots into the borders rather than planting them out into the soil. The roots grow through the bottom of the pot and into the soil below. I found this made the job of thinning out and subsequent harvesting easier. As soon as the shallots start to divide you need to thin them out (very carefully) to leave only 2 thinnings to grow on. It's quite a fiddly job, but the two that are left have room to develop into nice, large rounded shallots that look good on the show bench. This usually takes place in early May, and I'll discuss that further nearer the time.

The thinnings you take off can be planted elsewhere and will grow on to give small pickling shallots also.

Tuesday, January 09, 2007

Growing Cabbages for show


The cabbage class at most shows is fairly well supported as most people grow a row or two. But to win the class you will need to exhibit a reasonable sized, solid-hearted, matching pair with little or no sign of pest damage. After planting out your young plants in Spring and taking the usual precautions against cabbage root fly (whether it be dusting the stems at soil level with an insecticide or wrapping a carpet disc around it) then you may want to think about covering the plants completely with some heavy duty netting as shown above. This has two advantages.....first it prevents pigeons nibbling the young plants and later in the summer it helps keep off the cabbage white butterflies. However, vigilance is still required as the latter has a knack of somehow managing to get through the netting and laying the odd patch of eggs.

The netting I use was discarded from a building site and will last for many, many years.

I've also found that it helps to maintain a lovely deep green bloom as the sun doesn't seem to bleach them under their semi-shaded canopy.

On the morning of the Show cut at ground level to give a stalk at least 80mm long and snap off any old, yellowing or damaged foliage. Transport carefully to the show and display simply side-by-side on the show bench facing forwards. Try not to touch the head to spoil the 'bloom' and make sure their are no rogue slugs or caterpillars lurking amongst the foliage. The judge would not be impressed in close competition and may well use that as a reason to downpoint you.

Saturday, January 06, 2007

Growing carrots and parsnips for show


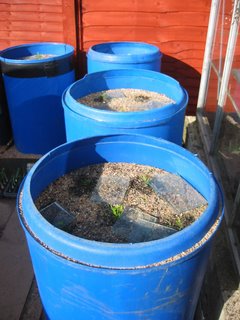
If you’ve ever been to a flower and vegetable show and wondered how the growers get their carrots and parsnips 4’ long then here is how it is done.

The secret is to get hold of some old oil drums or barrels, cut out the tops and bottoms and fill them with sand. 5 or 6 conical holes 3”across at the top are bored into the sand with a stout metal rod. The growers ‘special’ mix is sprinkled into the holes. In actuality this is nothing more than sieved compost/garden soil/vermiculite with a few ounces of fertilizers such as superphosphates and calcified seaweed. (I'll talk about this more during March and April when I do mine)

Around the middle of April a few carrot seeds are sown into a small indentation at the top of the compost ‘cone’ and covered. After 3 or 4 weeks when the seedlings are growing away, select your strongest seedling and cut the rest out at soil level.

A pane of glass over the top of each drum is necessary to stop cats digging in the sand (bless em!) and watering should be done sparingly in the early days to just keep the top surface moist. Once the carrots are well established the moisture in the sand should be sufficient and many growers cover them over from July so that no water gets to them whatsoever, thus encouraging the roots to go down in search of moisture.

There is no feeding required during the season as there should be sufficient fertilizers in the ‘mix’. However, a foliar feed can be given at intervals such as phostrogen.

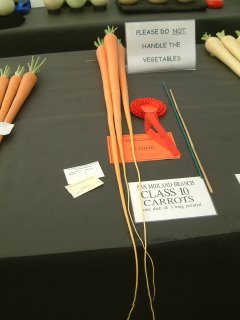
Extracting the roots on show day is the moment of truth. If everything was prepared properly all those months ago you should have long, tapering roots that look superb on the show bench. It can take 20 minutes to get each one from its ‘station’ intact…you want to get as much of the fine tap root up as possible so a lot of care must be taken. A soft sponge and clean water should be used to clean them carefully and all the fine root hairs should be removed. Reduce the foliage to 75mm if the schedule asks for it and display side-by-side on the show bench. Then all you have to do is await the ‘red card’.

The carrots shown above are from the National Vegetable Society Midland Championships held at Malvern at the end of September, grown by Jack Arrowsmith who manages to grow huge roots about 6' long. You don't have to get them this long or big but with a little effort you can achieve 3 to 4' quite easily.

Why not have a go? You’ve got the rest of the winter to get everything ready!

Wednesday, January 03, 2007

Happy New Year!


Just back from spending Christmas in the Lakes where I took the attached photo on a walk up Swirl How. It's Pike O'Blisco sticking up through the mist covering the valley floor. If you've never been to the Lakes then do yourselves a favour and go ! It's the most beautiful place on Earth I reckon and right on our doorsteps.

Back home and the garden's been absolutely hammered by rain so it's impossible to do anything outdoors. Most seeds have arrived and I'll be doing my compost mixes for the parsnips and carrots over the next few weeks. I shall also be doing a scale plan of my garden and working out exactly what goes where and when so that I only grow what I need and what will actually fit! (That's the plan anyways).