Search This Blog

Friday, March 30, 2007

Home made compost


I know I've mentioned my 'contraption' in a previous post but it's proving so successful I just can't talk about it enough....my missus and kids think i've gone compost mental. ('It's just mud Dad!')


I've always created loads of compost in 2 large wooden bins in the lane at the bottom of my garden but when you empty it out inevitably it has lumps in and bits of undecomposed plant material and other 'cruddy' matter. By sieving it in my new machine (which isn't really that hard to do) I get a lovely friable mix of compost out that looks lovely when added onto the beds and borders. The rough bits left over that won't go through the sieve are just thrown back onto the compost heap. Brilliant!


Thursday, March 29, 2007

The season so far

Thought I'd write where I'm at with my sowing and growing for looking back upon in future years!

Conservatory
Tomatoes (Cederico) - through and need pricking out
Peppers - one variety (Sweet Spot) to be pricked out. 2 varieties still not through after 2 weeks
Aubergines - need pricking out
Parsley - need pricking out
Cabbages (Brigadier&Kilaxy) - just poking through
Cherry toms (Sungold & Gardener's Delight) - just poking through

Greenhouse
Kelsae onions x 20 (plants bought in)
Leeks x 20 (plants bought in)
Tasco onions - 3 trays pricked out
Centurion sets - planted in cell trays and showing green shoots
Brussels - Brilliant & Rubine
Shallots - own saved sets potted up (need planting in next 2 weeks) and Matador grown from seed.

Garden
First 2 parsnips just poking through in their prepared stations
All other veg beds dug over and ready for planting

Garage
Seed potatoes in trays chitting.


Apart from that it's still fairly early days but this weeknd will see me 'boring' holes and sowing my long carrots in drums. I have 5 large drums and grow 7 'stations' in each one. I'm off for a whole week so need to use the time wisely and get as much done as possible in the garden.....there are loads of niggling maintenance jobs to do..........in order to get ahead of myself so that I can enjoy the rest of the season.

Tuesday, March 27, 2007

Scrapped!


I bit the bullet at the weekend and scrapped all the onions and leeks that I bought in January. They just hadn't ever 'taken off' despite being cossetted and quite a few had keeled over and died. I can't put my finger on why they failed.....the ones I had from the same supplier last year were fine.

So, I went over to a guy in Derby (the same chap I get the seed potatoes from) and purchased some more and was amazed at the size and quality of them. And they were cheap too!

So I now have 20 leeks and 20 onions of a decent size that should go on to become excellent specimens for the show bench. The leeks had a pipe lagging 'collar' put over them to start drawing them and to keep them nice and straight , tied to a small cane. The onions will be planted in my newly prepared greenhouse border soil in a month or so and the leeks will go outside in early to mid May. Both beds have had a strong fungicide applied to kill off (hopefully) the onion white rot spores that have plagued me for several years.

Friday, March 16, 2007

Medwyn Williams


Spent an interesting couple of hours last night in Derby at a lecture by Medwyn Williams MBE. He told us how he went about gaining 10 gold medals in a row at Chelsea Flower Show. He certainly is quite a character and kept us all enthralled with the stories of his trials and tribulations in trying to get a display of autum maturing veg ready in time for late May.
If you have ever been to Chelsea and seen one of his displays the thing that strikes you most is the vast array of different colours that can be achieved using different veg, from yellow carrots to purple cauliflowers and blue potatoes.
He's retired from doing Chelsea now but still 'shows' at the larger veg shows run by the NVS, and is actually President of the Society as well as being on several RHS committees. He's 'THE MAN'.

Thursday, March 15, 2007

Poor parsnip germination?


Parsnip seed is notoriously slow to germinate when sown outside, and can take several weeks to show through leaving you wondering whether it has failed altogether.

When growing for show those extra few weeks can be vital for the end result (i.e. what you display on the show bench) so I germinate my seed on kitchen towelling indoors.

I put some paper towel at the bottom of a tupperware container, sprinkle some compost over that and water lightly so that it isn't saturated. The seeds are placed on the surface of the compost so that they are just moistened by the wet compost. After a week or so the white root radicle will pop through the bottom end of the seed casing and at this point I put them (very carefully using tweezers) into the prepared stations in my raised beds, covering them over with 1/4" of sieved compost.

2 seeds are placed in each 'station'....the weakest one will be cut away if both come through. The seed leaves should be through the surface of the compost within 2 weeks, and I then place an upturned plastic bottle with the bottom cut out over each seedling to act as a mini-cloche. They soon romp away at that point and growth can be phenomenal if the weather is decent.

Sunday, March 04, 2007

Progress report


I was hoping to get my parsnips sown this weekend but it has rained non-stop and meant I've had to postpone it for another week. In fact I've never seen so much water in my garden and my garage floor is flooded. However, it won't hurt to wait another week as I've got everything ready......the soil and compost mixes are sieved and ready to go, and the various fertilizers have been weighed and stored. There's little point in working rigidly to calendar sowing dates if conditions are not right.

I've made a special contraption to make compost sieving easier on my back.....and quicker. I did my compost sieving in about 30 minutes when it used to take me a whole afternoon. I'm actually now looking forward to sieving compost for the carrot mixes in a month or so. It consists of a wooden box with a (6mm dia. hole) mesh bottom, mounted on wheels that run on a wooden frame on a metal table. A polythene 'chute' funnels the sieved compost/soil into a bin (See pics above). This will save me hours and hours in the coming weeks.

Today I also sowed my red cabbage, brussel sprouts, some peppers and some seeds of shallot 'Matador'. These are in my conservatory as it's a little cold to be putting them in my greenhouse yet. The only things in my greenhouse are the shallots, onion sets and onion and leek plants that I 'bought in'. However, now March is here things will really start to gather pace and the main sowing season will soon be upon us.

Wednesday, February 28, 2007

Same parsnip bed June 2006


This is a picture of the same parsnip bed in June of 2006 and you can see the young vigorous plants through the green netting. The netting helps to keep aphids off and also filters the wind and prevents breakages.
The glass panes over the top serve two purposes...in the early days they stop cats from digging the sand and leaving their deposits (I like cats.....but when they do that in my well prepared beds I could quite happily kill one....even ours!) and also keeps off excess rainwater. The idea is to keep the bed as dry as possible so that the tap root of the parsnip goes down in search of moisture. As the sand is a supposedly sterile medium the roots only stay in the compost mix that you trickle into the bore holes (see yesterday's post).
There should be no need to feed during the growing season as the compost mix has various fertilisers in it. I don't usually suffer from parsnip canker growing them in this method either and the roots do tend to come up quite clean with the minimum amount of cleaning required.
In 2006 I got 22 'station's in this bed but some of them turned out far too small so I'm going to decrease the amount I grow in this bed in the hope that the extra room will help them swell out a bit more.

Monday, February 26, 2007

Preparing Parsnip beds


This weekend will see me sowing my parsnips in raised beds and the pics above show the sequence of events that will take place.
Top left: I have constructed a raised bed from slabs on end with a timber frame on top of that. The whole thing has been filled with coarse sand and sterilised a few weeks ago in order to give it time to settle. Conical holes are bored with a stout metal rod about 4" diameter at the top and some 3-4 feet deep (Top growers will bore twice this depth!). I get about 18 or so in this bed but they're really a bit close for top level exhibiting, and I never seem to get heavy specimens.
Top right: The compost mix will have been prepared beforehand and sieved to remove any lumps. Carefully trickle it into each hole in turn......
Bottom left: ...........prodding with a cane every now and then to make sure there are no air pockets lower down.
Bottom right: The completed bed with all stations ready to accept the seed.
The seed is in my kitchen on moist tissue paper. As soon as the tiny white root radicle is showing through I will carefully place them into each station. This way I KNOW the seed has germinated. Parsnips are notoriously slow to germinate and if I sowed straight outside I could be waiting for weeks thereby losing valuable growing time.

Wednesday, February 21, 2007

I have a cunning plan........!

I've done what I said I was going to do and made a cropping plan of my veg plot so that I know exactly what I'm going to grow in each bed and where. That way I won't be tempted to grow too much and any plants that are left over will simply be given away. Too often in the past I've fallen into the trap of squeezing in those extra few seedlings that I've grown because I couldn't bear to throw them on the compost heap. It's false economy and you have to be ruthless.

Last night (after watching Man U's glorious victory against those mardy French gits) I sowed a pot of red onions. They don't usually win in the quality onion classes but I have a plan to grow as many red/purple veg of different types for entry into the 'trug of veg' classes. I think a basket full of dark coloured veg could look quite striking. So as well as red onions there'll be red tomatoes (obviously), radishes, purple carrots, aubergines, purple sprouts, beetroot, purple french beans, red potatoes etc etc.

I hope it'll look stunning and catch the judges eye. But there's a long way to go yet!

Saturday, February 17, 2007

Long time no post!


Been a busy few weeks at work and socially so it's a good job the weather's been against me as far as getting any gardening done.

I have however managed to empty the sand out of my parsnip beds and refill it, sterilising each 8" layer as I went along with Jeyes Fluid. I'll be sieving my mixes (more on this soon) in the next couple of weeks so that I can sow them early March.

My exhibition onions and leeks came last week from Vin Throup the legendary onion grower(saves having to grow your own and keeping them under lights and heat). They were all potted up into 3" pots and put into the greenhouse in a boxed off area to keep the frost off. A grolight over them keeps them ticking along nicely.

Apart from that I have only the shallots and a few potted up onion sets in the greenhouse. I'm hoping to empty my carrot drums out tomorrow and refill them, weather permitting. This afternoon I'm driving over to Ockbrook near Derby to collect my potatoes from Exhibition Seed Potatoes (ESP). The varieties I'll be growing this year are Winston and Nadine (whites) and Kestrel, Amour and Maxine (coloureds).

I've also just completed a 5 page 'showing hints' guide for publication on the website of my local show, as well as racking my brains for ideas for different classes.....we like to mix it up a bit each year to stop things getting stale.

Tuesday, January 16, 2007

Shallots potted up


I potted up my shallots at the weekend. Each one is planted in a 3" pot of 1/3 sterilised topsoil and 2/3 multipurpose compost with added seaweed and superphosphate. They were given a quick watering and put into a cold greenhouse where they won't now be watered again for several weeks as I want them to make good roots that fill the pot. At that point I will pot on into larger pots (probably 5 or 6").

Last year I actually buried these pots into the borders rather than planting them out into the soil. The roots grow through the bottom of the pot and into the soil below. I found this made the job of thinning out and subsequent harvesting easier. As soon as the shallots start to divide you need to thin them out (very carefully) to leave only 2 thinnings to grow on. It's quite a fiddly job, but the two that are left have room to develop into nice, large rounded shallots that look good on the show bench. This usually takes place in early May, and I'll discuss that further nearer the time.

The thinnings you take off can be planted elsewhere and will grow on to give small pickling shallots also.

Tuesday, January 09, 2007

Growing Cabbages for show


The cabbage class at most shows is fairly well supported as most people grow a row or two. But to win the class you will need to exhibit a reasonable sized, solid-hearted, matching pair with little or no sign of pest damage. After planting out your young plants in Spring and taking the usual precautions against cabbage root fly (whether it be dusting the stems at soil level with an insecticide or wrapping a carpet disc around it) then you may want to think about covering the plants completely with some heavy duty netting as shown above. This has two advantages.....first it prevents pigeons nibbling the young plants and later in the summer it helps keep off the cabbage white butterflies. However, vigilance is still required as the latter has a knack of somehow managing to get through the netting and laying the odd patch of eggs.

The netting I use was discarded from a building site and will last for many, many years.

I've also found that it helps to maintain a lovely deep green bloom as the sun doesn't seem to bleach them under their semi-shaded canopy.

On the morning of the Show cut at ground level to give a stalk at least 80mm long and snap off any old, yellowing or damaged foliage. Transport carefully to the show and display simply side-by-side on the show bench facing forwards. Try not to touch the head to spoil the 'bloom' and make sure their are no rogue slugs or caterpillars lurking amongst the foliage. The judge would not be impressed in close competition and may well use that as a reason to downpoint you.

Saturday, January 06, 2007

Growing carrots and parsnips for show


If you’ve ever been to a flower and vegetable show and wondered how the growers get their carrots and parsnips 4’ long then here is how it is done.

The secret is to get hold of some old oil drums or barrels, cut out the tops and bottoms and fill them with sand. 5 or 6 conical holes 3”across at the top are bored into the sand with a stout metal rod. The growers ‘special’ mix is sprinkled into the holes. In actuality this is nothing more than sieved compost/garden soil/vermiculite with a few ounces of fertilizers such as superphosphates and calcified seaweed. (I'll talk about this more during March and April when I do mine)

Around the middle of April a few carrot seeds are sown into a small indentation at the top of the compost ‘cone’ and covered. After 3 or 4 weeks when the seedlings are growing away, select your strongest seedling and cut the rest out at soil level.

A pane of glass over the top of each drum is necessary to stop cats digging in the sand (bless em!) and watering should be done sparingly in the early days to just keep the top surface moist. Once the carrots are well established the moisture in the sand should be sufficient and many growers cover them over from July so that no water gets to them whatsoever, thus encouraging the roots to go down in search of moisture.

There is no feeding required during the season as there should be sufficient fertilizers in the ‘mix’. However, a foliar feed can be given at intervals such as phostrogen.

Extracting the roots on show day is the moment of truth. If everything was prepared properly all those months ago you should have long, tapering roots that look superb on the show bench. It can take 20 minutes to get each one from its ‘station’ intact…you want to get as much of the fine tap root up as possible so a lot of care must be taken. A soft sponge and clean water should be used to clean them carefully and all the fine root hairs should be removed. Reduce the foliage to 75mm if the schedule asks for it and display side-by-side on the show bench. Then all you have to do is await the ‘red card’.

The carrots shown above are from the National Vegetable Society Midland Championships held at Malvern at the end of September, grown by Jack Arrowsmith who manages to grow huge roots about 6' long. You don't have to get them this long or big but with a little effort you can achieve 3 to 4' quite easily.

Why not have a go? You’ve got the rest of the winter to get everything ready!

Wednesday, January 03, 2007

Happy New Year!


Just back from spending Christmas in the Lakes where I took the attached photo on a walk up Swirl How. It's Pike O'Blisco sticking up through the mist covering the valley floor. If you've never been to the Lakes then do yourselves a favour and go ! It's the most beautiful place on Earth I reckon and right on our doorsteps.

Back home and the garden's been absolutely hammered by rain so it's impossible to do anything outdoors. Most seeds have arrived and I'll be doing my compost mixes for the parsnips and carrots over the next few weeks. I shall also be doing a scale plan of my garden and working out exactly what goes where and when so that I only grow what I need and what will actually fit! (That's the plan anyways).

Tuesday, December 12, 2006

Growing beetroot for show


At most shows the beetroot class is well contested as everyone seems to grow it. But you need to know a few things to be able to win the class.

I sow several rows spaced a week apart from early May until the beginning of June. This allows me to cover the show period from late August to early October. If you choose a monogerm variety such as Red Ace then there is less need for fiddly thinning. Most beetroot varieties are actually seed clusters that can result in 3 or more seedlings coming through.

The rows need to be well watered during the summer and not allowed to dry out as this can cause corkiness around the shoulders. To prevent this the whole shoulder needs to be regularly covered over with moist soil, but this can be laborious and in any case there is a way of combatting this during the washing process (see below).

I read somewhere that the internal colouring of beetroot can be inproved by the addition of salt in the watering can. I don't know if this actually does help but it certainly hasn't caused any harm when I've tried it.

I like to lift my beet a day before the show so that I'm not rushing about too much. Each root should be about the size of a tennis ball, slightly smaller preferably but certainly no bigger. And there should be a nice long central tap root coming from the exact centre of each. Sometimes these tap roots can fork a few inches down but I snip off any excess roots to give the impression of one single long tap root. Discard any specimens showing signs of slug or pest damage and retire the kitchen sink.

Wash off any loose soil under running water and scrub gently with the soft side of a scouring pad to make the root's colouring shine out, taking care when washing the tap root so as not to break it. If the shoulders are 'corky' the rough side of the scourer can be used to rub off the corkiness (GENTLY!) . It might pay to practice on some 'rejects' first!

Discard any yellowing leaves and immerse your chosen roots overnight in a bucket of cold water mixed with a few teaspoons of salt and a dash or three of vinegar. This seems to bring out the colouring of the beet but you do need to make sure you give them a good rinse before you go to the show or else the judge can smell the vinegar on them when he picks them up for closer inspection.

Bear in mind also that the judge will cut a slice out of one of your roots to check the internal colouring and to make sure there are not any white rings that denote poor watering.

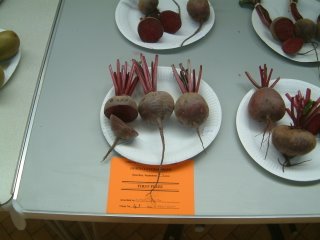
At the show stage them straight onto the show bench facing towards the front, with the foliage tied neatly with string or raffia. Some shows require the foliage to be cut to a certain length and this needs to be done or else the exhibit may be marked down as NAS (not as schedule).

If you have 3 roots all the same size, with nice, bright, red/purple colouring and a nice long, straight taproot then the red card should be yours!